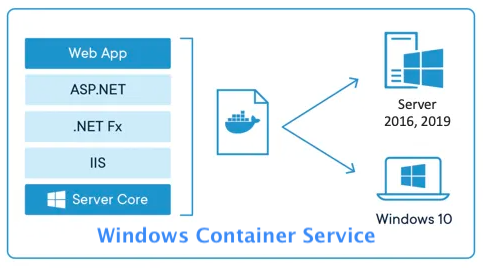
A step-by-step guide to setting up a Windows container worker node and a sample app on AWS EKS. This is to simply to support Windows application development with a container (e.g. NET, PowerShell, etc.). We should build the Windows worker node to support the application running on top of it.
To be honest, I think the Windows container needs more time to mature before it can provide a lightweight design and base image to make it more efficient. However, if you want to see a free trial, you can follow the steps below to set up a worker node and application on top of AWS EKS.
Installation Prerequisites
First and foremost, Kubernetes clusters must be up and running with at least one Linux-based worker node to run the core system: kubernetes v1.14+.
EKS CTL eksctl should be installed to support worker node creation.
See Kubernetes’ documentation and eksctl on GitHub to learn more.
Create Windows Worker Node
Install the VPC resource controller and admission webhook via eksctl to enable Windows support:
# Change CLUSTER_NAME to your EKS Clustereksctl utils install-vpc-controllers --cluster [CLUSTER_NAME] --approve
As noted in the Amazon EKS docs, you can also use another approach to enable Windows support.
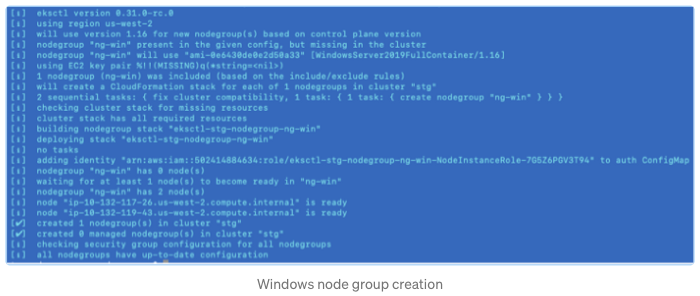
Create a Windows node group:
# Change REGION_NAME, CLUSTER_NAME, GROUP_NAME, node-type to your EKS Clustereksctl create nodegroup --region [REGION_NAME] --cluster [CLUSTER_NAME] --name [GROUP_NAME] --node-type [m5.large] --nodes 2 --nodes-min 1 --nodes-max 2 --node-ami-family WindowsServer2019FullContainer --asg-access --external-dns-access --full-ecr-access --alb-ingress-access --node-private-networking

Follow the steps above. When it’s done, you can use the command below to validate if the Windows worker nodes are up and running:
kubectl get nodes -L kubernetes.io/os

Deploy Simple Windows Service
Use the YAML file below to deploy Windows Server IIS with the Windows worker node. You can make use of node selector kubernetes.is/os: windows and the base image windows server core.
For Windows containers, there are 4r container base images provided:
- Windows Server Core
- Nano Server
- Windows
- Windows IoT Core
Now listen; To know more about Windows container base images, see the documentation from Microsoft.
cat << EOF | kubectl apply -f -

apiVersion: apps/v1
kind: Deployment
metadata:
  name: windows-server-iis
  namespace: default
spec:
  selector:
    matchLabels:
      app: windows-server-iis
      tier: backend
      track: stable
  replicas: 1
  template:
    metadata:
      labels:
        app: windows-server-iis
        tier: backend
        track: stable
    spec:
      containers:
      - name: windows-server-iis
        image: mcr.microsoft.com/windows/servercore:1809
        ports:
        - name: http
          containerPort: 80
        imagePullPolicy: IfNotPresent
        command:
        - powershell.exe
        - -command
        - "Add-WindowsFeature Web-Server; Invoke-WebRequest -UseBasicParsing -Uri 'https://dotnetbinaries.blob.core.windows.net/servicemonitor/2.0.1.6/ServiceMonitor.exe' -OutFile 'C:\\ServiceMonitor.exe'; echo '<html><body><br/><br/><marquee><H1>Hello EKS!!!<H1><marquee></body><html>' > C:\\inetpub\\wwwroot\\default.html; C:\\ServiceMonitor.exe 'w3svc'; "
      nodeSelector:
        kubernetes.io/os: windows
---
apiVersion: v1
kind: Service
metadata:
  name: windows-server-iis-service
  namespace: default
spec:
  ports:
  - port: 80
    protocol: TCP
    targetPort: 80
  selector:
    app: windows-server-iis
    tier: backend
    track: stable
  sessionAffinity: None
  type: LoadBalancerEOF
Looks cool right? Since the base image is big, it would take some time to pull the image. As a user, you will be able to connect to the IIS after the container is up and running.


Finally, in this post, we explained the guide on how to Build a Windows Container Service on a Kubernetes Cluster.


![10 Best Udemy Docker and Kubernetes Courses & Tutorials 10 Best Udemy Kubernetes Courses & Tutorials [2021]](https://hybridcloudtech.com/wp-content/uploads/2021/01/10-Best-Udemy-Kubernetes-Courses-Tutorials-2021-100x70.jpg)
![10 Free Kubernetes Courses Online Tutorials [Udemy] 10 Free Kubernetes Courses Online Tutorials [Udemy]](https://hybridcloudtech.com/wp-content/uploads/2021/02/10-Free-Kubernetes-Courses-Online-Tutorials-Udemy-100x70.png)

![[Udemy] Learn DevOps: The Complete Kubernetes Course Udemy Learn DevOps 2021 - Complete Kubernetes Course](https://hybridcloudtech.com/wp-content/uploads/2021/02/Udemy-Learn-DevOps-2021-Complete-Kubernetes-Course-100x70.png)