


Let us learn MAC terminal ninja secrets to boost productivity. Although this article focuses on macOS, many of the keyboard shortcuts and commands are also applicable to Linux. I’ll give you some pointers that will set you apart from the rest of the terminal crowd. Master Mac/Linux Terminal Command Shortcuts Download.
In the cause of this tutorial, you will learn mac terminal commands, get link access to mac terminal commands pdf, know the full list files in directory mac terminal. In addition, we will know how to open a directory in terminal mac, change directory mac terminal, download terminal for mac. Finally, after reading, we hope you will get an idea on how to go to home directory in mac terminal and how to navigate in terminal mac.
Note that we will cover the following subheadings:
- First, Setting up the macOS terminal configuration.
- Secondly, Finding keyboard shortcuts.
- Thirdly, Exploring built-in command functions, including how to search the command history.
- Fourthly, Finding command names.
- Fifthly, Finding key sequences.
- Lastly, How to bind a command name to a key sequence for personal use.
Now, sit down, relax, roll up your sleeves and let’s begin the tutorial.
1. Moving the Cursor Using Ctrl-E and Ctrl-A
If you’re using macOS, ZSH is your default shell (since Catalina). Let’s see what version of ZSH you have:
$ zsh --version
zsh 5.8 (x86_64-apple-darwin20.0)
The Ctrl-a moves the cursor to the starting point of the line and Ctrl-e moves the cursor to the last part of the line. The question here is; how can you move the cursor word by word backward and forward?

2. Moving the Cursor Backward/Forward by a Word
So, the Bash binding for backward-word or “Move backward one character” is Meta-b. For the forward-word or “Move forward one word,” it is Meta-f. However, since the escape key in the keyboard is a meta, Esc-b and Esc-f should work perfectly.
Next, on the built-in terminal and iTerm, Esc-b moves the cursor backward by a word and Esc-f moves the cursor forward by a word. Bear in mind that you have to release the Esc key each time. If not, he command will type B or F. That is to say, releasing the Esc key isn’t really convenient. Therefore, let us designate the Esc key to the Option key so that you don’t have to release it every single time.
3. How To Disable Special Characters on macOS
This is for those people using the Apple’s MacOS computers. My questions to you now is this; what result do you exactly get when you press Option-b and Option-f? So, if we get ∫ ƒ, then you haveto modify the terminal preferences. Let’s go ahead and assign Esc to the Option key.
iTerm2
What is iTerm2? It’s a replacement for the terminal, and it works on Mac computers. iTerm2 as well as the built-in terminal provide a full pack of simple shortcuts for moving up and down. Additionally it helps editing to be easier and works efficiently.
In the same vain, for the iTerm2 users, you have to select Esc+ for the “Left Option Key” in Preferences > Profile > Keys. After that, you can simply use Option-b for the previous word and Option-f for the next character.
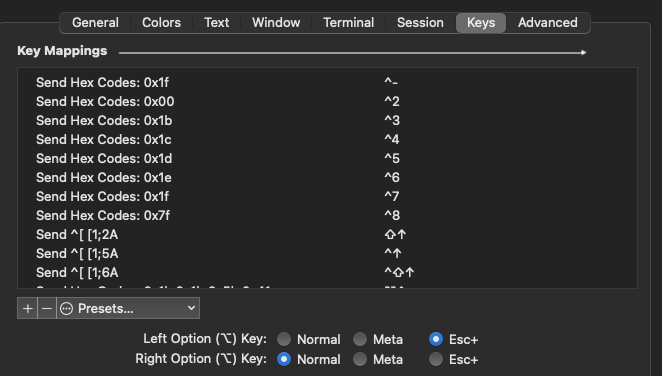
Notice this: Your Esc key is known as a “Meta Key” or modifier. Secondly, by setting the left Option key to another Esc key, therefore, you can use it as the modifier.
Built-in terminal
Net, set “Use Option as Meta key” in Preferences > Profiles > Keyboard for the built-in terminal.
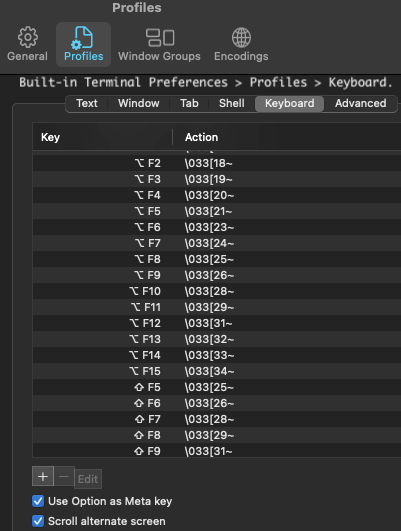
Finally, the Option-b and Option-f should work as backward-word and forward-word.
Option-RightArrow and Option-LeftArrow in iTerm2
Note as a reminder that Option-LeftArrow and Option-RightArrow work on a built-in terminal as forward-word and backward-word. However, they won’t work on iTerm2 as can be seen above. Now, let us solve this one also.
Go to iTerm2 Preferences > Your Default Profile Name > Keys. For a better understanding, I bring you the following key mapping for Option-LeftArrow:
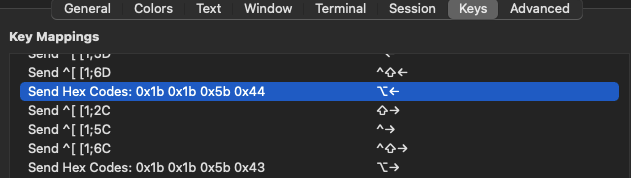
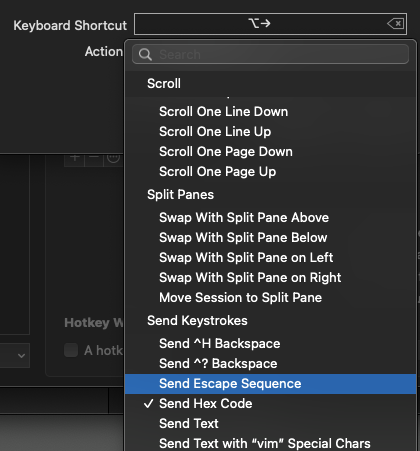
You will have to Press + button to add a keyboard shortcut. Additionally, also Press Option-RightArrow in the “Keyboard Shortcut,”. and for the Action field, choose “Send Escape Sequence.” After that, type f in the Esc+ field.
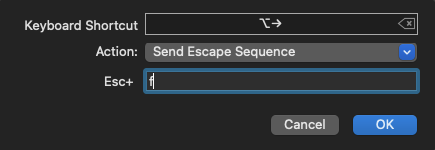
Right now we have ^[f for Option-RightArrow. The ^[ symbol in the image above simply means “escape” in key mapping.
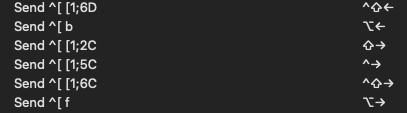
That was easy right? If yes, then do the same thing for Option-LeftArrow using b.
Now the Option-RightArrow and Option-LeftArrow should work perfectly as expected.
4. Keyboard Shortcuts
Cursor movement
The keyboard shortcuts can be used to move the cursor around the command line.
What happens when the control key is held down? The letter keys produce the same control characters notwithstanding the state of the shift or caps lock keys.
To put it another way, it makes no difference if the key created an uppercase or lowercase letter. We’ll use the ZLE command name within the parentheses later in the article (ZSH has its own line editor, known as ZSH Line Editor or zle in short form).
- 1.
Ctrl-Amoves the cursor to the beginning of the line (beginning-of-line). - 2.
Ctrl-Bmoves the cursor backward one character (backward-char). - 3.
Ctrl-Emoves the cursor to the end of the line (end-of-line). - 4.
Ctrl-Fmoves the cursor forward (right) one character (farward-char). - 5.
Opt/Alt-bmoves the cursor back one word. We fixed this in the first part of this article (backward-word). - 6.
Opt/Alt-fmoves the cursor forward one word. We fixed this in the first part of this article (forward-word).
On macOS, fn-LeftArrow moves the cursor to the beginning of the line and fn-RightArrow moves the cursor to the end of the line.
Editing of text
To edit texts in the command line, use shortcuts to delete a character, switch characters, cut, clear, and yank.
Ctrl-Ddeletes one character under the cursor (delete-char-or-list).Ctrl-Hdeletes one character before the cursor (backward-delete-char).Ctrl-Kcuts the line from the cursor to the end of the line to the clipboard. The command name is calledkill-line. You can useCtrl-yto paste (kill-line).Ctrl-Tswaps the cursor with the previous character (transport-chars).Ctrl-Uclears to the beginning of the line (BASH). ZSH clears the line. We are going to change this later (backward-kill-line).Ctrl-Wcuts the word before the cursor (backward-kill-word).Ctrl-Yyanks/pastes the last thing from the cut command (yank).Opt/Alt-Tswaps the word with the previous word (transpose-words).Opt/Alt-ddeletes the word from the cursor (kill-word).Opt/Alt-deletedeletes the word before the cursor.Opt/Alt-ccapitalizes the character under the cursor and moves to the end of the word (capitalize-word).
Process and others
Ctrl-Ckills/stops the current process.Ctrl-Zsuspends/terminates the current processfgto return the process.Ctrl-Jis the same as theRETURN/ENTERkey (accept-line).Ctrl-Lclears the screen (clean-screen).Ctrl-Mis the same as theRETURN/ENTERkey (acceopt-line).
5. Searching Command History
The Up Arrow and Down Arrow keys go back in the command history. Your ~/.history file contains all your command history. The next four commands search the history more efficiently.
Ctrl-R’s binding key is history-incremental-search-backward. This searches through the previously used command and returns the most recent one. To cycle through alternatives, you can use Ctrl-R repeatedly. It will show you the next matching history item as you type.
You can use Ctrl-S to search forward. After using Ctrl-R, you can change the search direction by Ctrl-S.
To leave the history search mode, use Ctrl-G.
Ctrl-RandCtrl-Stake more than one word, whereas the followingESC-pandESC-ntake only one word.ESC-pgoes to the previous line in history starting with the word (history-search-backward).ESC-ngoes to the next line in history starting with the word (history-search-forward).ESC-pandESC-nsimply cycle through history items that match with the first word.

6. Finding Editor Command Names
All of your editor’s commands and key bindings can be found by using bindkey or bindkey -L. Almost of the command names have the form of hyphenated words, such as history-search-backward. take a look at the list below which tells you all your terminal key bindings.
$ bindkey -L
bindkey "^@" set-mark-command
bindkey "^A" beginning-of-line
bindkey "^B" backward-char
bindkey "^D" delete-char-or-list
bindkey "^E" end-of-line
bindkey "^F" forward-char
bindkey "^G" send-break
...
...
See all the outputs from my macOS. The ^A means Ctrl-A and ^[ means the escape key or option key (we set up this in the first section of this article). So for example, "^[^H" backward-kill-word means pressing Opt-Ctrl-h. It deletes a word backward.
You can find what the function of Ctrl-y is:
$ bindkey '\C-y'
"^Y" yank
Or you can find the command name from a key using the grep -F command. The -F interprets a pattern as a set of fixed strings.
$ bindkey | grep -F "^Y"
"^Y" yank
$ bindkey | grep -F "^[[A"
"^[[A" up-line-or-history
7. Finding the Key Sequences
What percentage of the time do you use feature keys? If you don’t use function keys like I do, you may want to bind them.
A main sequence consists of one or more input events in a particular order. The key sequences for your feature keys, control keys, escape keys, and arrow keys are all different.
Surely, you can now locate these key sequences. The read or cat command finds the key sequence. Let’s find the function key sequences from F12 to F1. What next? After typing read or cat, press enter on the terminal. Press fn-F12 and fn-F11 to find out the key sequence.
$ read
^[OP   # output from F1
^[OQ   # output from F2
^[OR   # output from F3
^[OS   # output from F4
^[[15~ # output from F5
^[[17~ # output from F6
^[[18~ # output from F7
^[[19~ # output from F8
^[[20~ # output from F9
^[[21~ # output from F10^[[24~ # output from F12
Note: On my macOS, F11 is bound to “Show Desktop.” I just leave it as it is.
How about SHIFT-Function keys?
$ read
^[[1;2P  # SHIFT-F1
^[[1;2Q  # SHIFT-F2
^[[1;2R  # SHIFT-F3
^[[1;2S  # SHIFT-F4
^[[15;2~ # SHIFT-F5
...
You can find the key sequence for the arrows:
^[[A # up-arrow
^[[B # down-arrow
^[[C # right-arrow
^[[D # left-arrow
Again, ^[ represents an escape character and the shell knows ^[ as \e.
8. How To Bind an Editor Command to a Key Sequence
We can tie the feature key sequences and command names together now that we know them.
It’s worth remembering that when using a control key, case doesn’t matter. The letter case does matter when using other keys, such as the opt key.
# ctrl-u or ctrl-U
^U
# opt-u
^[u
# opt-U. It is different from opt-u
^[U
Add the following to ~/.zshrc:
# This binds Ctrl-u to backward-kill-line
bindkey '^U' backward-kill-line# This binds Opt-u to kill-whole-line. Remember we changed the opt key to Esc.
bindkey '\eu' kill-whole-line
You can check it on the terminal:
$ bindkey -L | grep -F "^U"
bindkey "^U" backward-kill-line
bindkey "^X^U" undo$ bindkey -L | grep -F "^[u"
bindkey "^[u" kill-whole-line
Let’s bind a function key to backward-kill-line:
# binding F1 to backward-kill-line. F1 key sequence is ^[OP.
bindkey '\eOP' backward-kill-line# binding Opt-p/Esc-p to history-beginning-search-backward
bindkey '\ep' history-beginning-search-backward
Next, let’s bind the function-12 key to perform the command forward-word.
Remember to use \e for Esc, \b for the backspace, and \t for Tab.
Master Mac/Linux Terminal Command Shortcuts Bonus Tips
If you know a command name, you can execute it using Esc-x.
While typing a command, you can press Esc-x to show execute: to execute a ZSH command. Type a word and press Tab to show the commands available.

Conclusion
In summary, I hope you’re comfortable with command-line navigation and best practises at this stage. Finally, as you communicate with the shell, find useful command names, and build keyboard shortcuts in the ZSH, this information will save you time.
Now that we have con to the finish line of this article, you now know how to:
- Find all the key bindings with
bindkey -L. - Find the key sequences with
read. - Start using keyboard shortcuts, including history search.
- Bind function keys to the ZLE commands.
Enjoy, and Happy coding my people!!!
Trending Articles
- Amazon Linux Security EC2 Hardening Script Guide
- Talos OS v0.7 Platform – Modern Systems Kubernetes
- Linux Operating Systems for Kubernetes – OS Support
- Container 101 Tutorials: Kubernetes Technology
- Container 101 Tutorials: Kubernetes & Docker Technology
- UNIX & Linux File Permissions | Read/Write & Change – Part 1
- Managing Linux Advanced File Permissions — Part 2
- Kubectl command – How to Add or Remove Labels to Nodes in Kubernetes

 – Courses on Online University")


